
How to use Undo and Redo in AutoCAD

1.
a)Open AutoCAD application from desktop shortcut menu.
b)Select new document icon from quick access toolbar and open “ansi-a” template.
c)Now click on model layout tab.
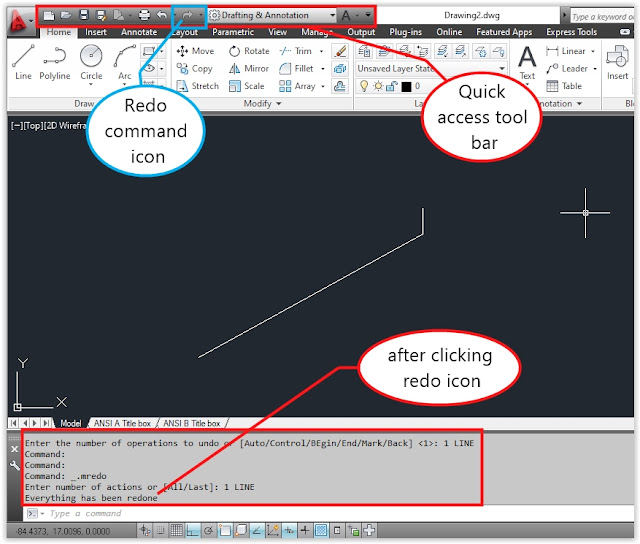
d)Draw a line by using line command.


2.

3.

4.Now save the drawing by clicking on save icon from quick access tool bar.


Trending

Draw a line using polar co-ordinate system in AutoCAD

1. Open AutoCAD software from desktop short cut or from start menu.   2. Now type "LINE" and press ENTER KEY. Then enter 0,0 as first point of the line.   3. Then type 5<30 as second point of the line. This "<" symbol is used for the line point moves to 30 degrees from positive x-axis. 4.  Now again type 2.45<270 as next point of the line. 5. After generating the line press <Esc> key from key board to exit from line command. The lines shown like below image. BACK to Day-1 Lessions CLICK HERE to get CAD HOME Work help or project help (paid)

How to start AutoCAD software in windows operating system?

1. Click on window button located near left bottom corner then click on AutoDesk or AutoCAD folder then select "AutoCAD" to open the software. or Type "AutoCAD" in the search box located near bottom left corner of the desktop then right click on the displayed application the select "Run as administrator" option. 2. Then AutoCAD application opened look like bellow image. (it will take time depending upon the system configuration). 3. Basic user interface of the AutoCAD application. BACK to Day-1 Lessions CLICK HERE to get CAD HOME Work help or project help (paid)

How to change dashed line spacing in AutoCAD

1. a)Open AutoCAD application from desktop shortcut icon or start menu. b)Click on “Open icon” and select previously saved file then click on “Open” button to open the document. 2.Type “LTSCALE” and press ENTER KEY now AutoCAD prompts for linetype scale factor. 3.Type “.5” as linetype scale factor and press ENTER KEY. 4.Save the document by clicking on quick save icon from quick access tool bar.

Procedure to create a block with attributes in AutoCAD

1. a)Open AutoCAD application from desktop shortcut icon or start menu. b)Click on “open icon” and select “acad” file then click on “Open” button to start new document. 2.Type “ATTDEF” and press ENTER KEY to create attributes. 3.Save the document by click on quick save icon from quick access tool bar.

step by step procedure to changing dimension styles in AutoCAD

1. a)Open AutoCAD application from desktop shortcut menu. b)Select new document icon from quick access toolbar and open "ansi-a" template. c)Now click on model layout tab. d)Click on “LINE” command from draw panel. e)Now move the cursor to 4 units in X axis and 2 units in Y axis and pick the line stating point. f)Now move the cursor 2 units horzontally rights side and pick another point of the line. g)Like wise above steps move the cursor or cross hair to required points shown bellow image and pick the points to get the required shape. h)Finally enter “C” to close the line. i)And draw circle by using Circle command. j)And draw the center lines. k)Then apply it’s layers accordingly. Now click on Annotate menu to view annotate tools ribbon. 2.Now click on dimension style icon to view dimension settings dailog box. 3.Now click on modify button in dimension style manager window. After clicking MODIFY button AutoCAD displays Modify Dimension Style standard dailog b

Step by step procedure to extract attributes in AutoCAD

1. a)Open AutoCAD application from desktop shortcut icon or start menu. b)Click on “open icon” and select “EX16-8” file then click on “Open” button. 2.Type “DATAEXTRACTION” command and press ENTER KEY then add the extracted data by using below shown steps. 3.Save the document by clicking on quick save icon from quick access tool bar.

How to offesetting objects with construction lines in AutoCAD

1. a)Open AutoCAD application from desktop shortcut icon or start menu. b)Open previously saved document. 2.Click on the drop down arrow near Draw and select “XLINE” tool. 3.Select “Offset” tool. 4.AutoCAD prompts for offset distance. 5.Type “2” as offset distance and press ENTER KEY. 6.Select right side vertical line to offset. 7.Move the cursor right wards and pick a point to offset the selected element. 8.Now again AutoCAD prompts for selecting elements. 9.Pick top most horizontal line and move the cursor upwards and pick a point anywhere at upside to the selected element. 10.Press ENTER KEY to exit from “XLINE” command. 11.Now select “XLINE” from draw panel and select “Offset” tool and type “3” as offset distance and press ENTER KEY then select newly generated vertical line and move the mouse right wards and pick a point to offset the selected element in right wards. Again select “XLINE” from draw panel and select “Offset” tool from modify panel and type “3” as offset

How to use quick properties palette in AutoCAD

1. a)Open AutoCAD application from desktop shortcut menu. b)Select new document icon from quick access toolbar and open “ansi-a” template. c)Now click on model layout tab. d)Click on “LINE” command from draw panel. e)Now move the cursor to 4 units in X axis and 2 units in Y axis and pick the line stating point. f)Now move the cursor 2 units horzontally rights side and pick another point of the line. g)Like wise above steps move the cursor or cross hair to required points shown bellow image and pick the points to get the required shape. h)Finally enter “C” to close the line. i)And draw circle by using Circle command. j)Now drag the mouse over the circle after pressing left mouse button below the circle and end the dragging after closing the circle. 2. 3. 4. After changing center X value. See the image. 5. Now change center Y value. See the image. 6. After pressing key form KEY BOARD the circle deselected and quick properties window also disappears. 7.

Steps to how we navigate the drawing in AutoCAD

1. a)Open AutoCAD application from desktop shortcut menu. b)Select new document icon from quick access toolbar and open “ansi-a” template. c)Now click on model layout tab. d)Click on “LINE” command from draw panel. e)Now move the cursor to 4 units in X axis and 2 units in Y axis and pick the line stating point. f)Now move the cursor 2 units horzontally rights side and pick another point of the line. g)Like wise above steps move the cursor or cross hair to required points shown bellow image and pick the points to get the required shape. h)Finally enter “C” to close the line. i)And draw circle by using Circle command. j)Now select Zoom window command icon from View ribbon Navigate 2D panel. 2. 3. After clicking the opposite corner point now we can see the selected window filled with workspace display. See the image below. 4. After clicking the zoom previous icon from quick access tool bar. Now we can see the drawing with previous zoom. 5. After clicking Zoom Extents o

Setting up a new drawing in AutoCAD

1. a)Open AutoCAD application from desktop short cut or start menu. b)Now click on “New” icon from quick access tool bar located near top left coner of the application window. c)Then AutoCAD displays default Template folder.how to start new AutoCAD drawing from template 2.Now click on the dropdown arrow button to browse the requried template.AutoCAD browse files to openNOTE: Make sure to browse the templete file folder location. 3.Then select the template file and click on open button now we can see the template file in the workspace to start the drawing. Select AutoCAD template (DWT) file and open it. 4.Now click on the “SAVE” icon to save the current drawing from quick access toolbar. See the below image.Save the AutoCAD file with new name. BACK to Day-2 Lessions